Hibernation on GNU/Linux.
Intro
Hibernation on Linux is confusing and messy, some distros do it for you and some don't. Here's a short guide on how you can diy easily.
The main part of this guide is focused around "Step 6. Enabling hibernation". The rest can be viewed as general advice to get up to that point but there are various methods to achieve the same result, the following steps document my attempt at achieving a reliable hibernation state on lid close.
Prerequisites
Hibernation won't work with Secure Boot enabled, disable it from your BIOS.
Tangible:
- USB stick.
- Disk space for SWAP.
DISCLAIMER
"its highly recommended that you DO NOT create a swap partition on an SSD, unless you want to severely reduce its lifespan."
Choosing the right distro
Install a distro of choice.
| Distro | Time spent getting Hibernation to work |
| Debian (non-free liveiso) | 0 minutes |
| Manjaro | 0 minutes |
| Arch/Ubuntu (anything w/ systemd) | ~15 minutes |
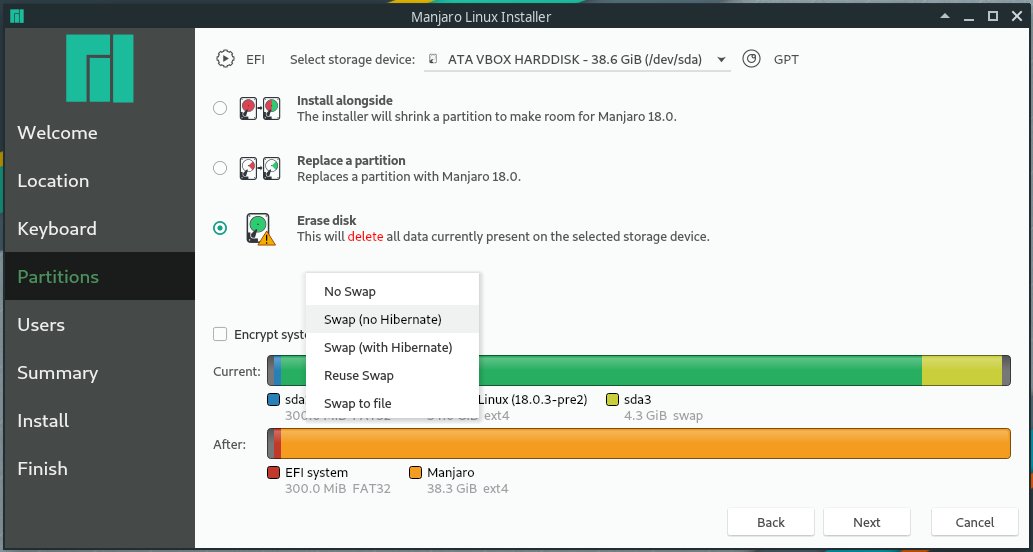
Any distro with calamares installer (ex: debian & manjaro) should support hibernation out-of-the-box and so you can skip this entire guide. When configuring swap, click the dropdown and select "with Hibernation"
If you don't want to reinstall just for that (and you really shouldn't be doing so) continue reading on, it only takes 15-20 minutes to setup as long as you have systemd.
Configuring Swap
If you are already running a distro with systemd then you can easily setup hibernation as long as you have (totalmem + sqrt(totalmem)) bytes of free disk space formatted as a swap partition.
If hibernation is used, swap size should be equal to size of RAM plus the square root of the RAM size
When you are installing a distro make a swap partition of (totalmem + sqrt(totalmem)) size in bytes, this should ensure swap works properly.
Chances are you already have swap setup by your distro, if not; no need to worry - we shall setup swap from scratch. You can check with the following command:
sudo swapon --show
Step 1 - Creating live iso
You must use a swap partition and preferably at the end of your beginning or end of the disk (hdd or ssd*1).
To create a swap partition on a disk layout that does not have one requires a USB stick to boot off of. You need to dd a distro with gparted to your usb and boot from it.
sudo dd if=linux.iso of=/dev/sdX status=progress;sync
Step 2 - Booting from the live iso
Boot the usb
systemctl reboot –firmware-setup
Step 3 - Running gparted
Install &/or open gparted.
sudo apt install -y gparted
gparted
Step 4 - Creating the SWAP partition
Right click your drive and resize it so that you have (totalmem + sqrt(totalmem)) free space at the end or the begining.
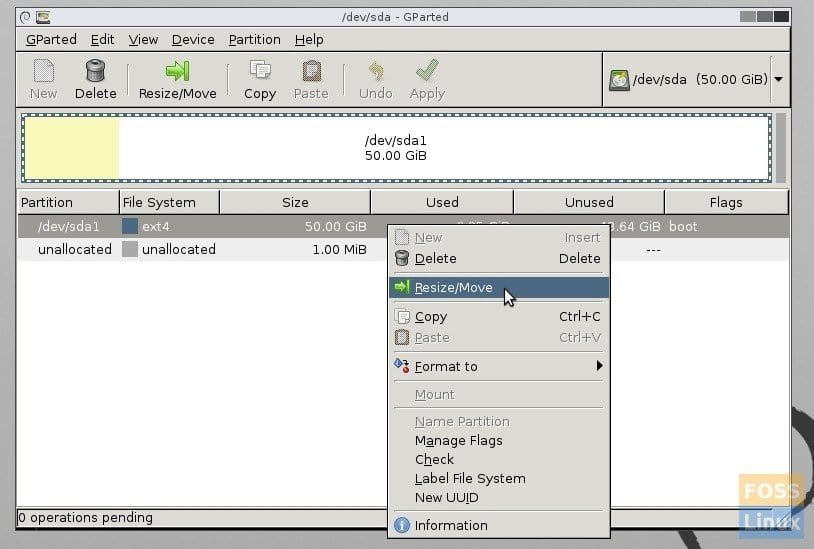
Gparted will take a few minutes to allocate the space properly and resize your drive as requested.
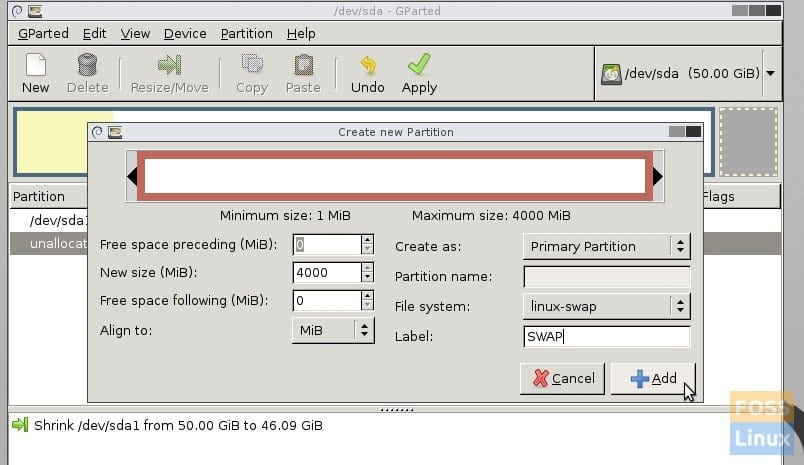
You will see unallocated file system of the size you created. Right-click on it and select ‘New’. In the context menu, select ‘File system’ as ‘linux-swap’. Click ‘Add’ then 'Apply'.
Reboot & unplug the drive.
Step 5 - Enabling SWAP
First we must locate the newly created SWAP partition.
sudo fdisk -l
Example output:

Swap in this case is located at /dev/sda3, if you have an nvme ssd it will be something like: /dev/nvme1n1p3, its usually your last or first partition (so all the bytes can stay clumped together).
Second we must let our filesystem tab acknowledge its existence
sudo nano /etc/fstab
Append the following line replacing sdaX with the partition on which swap resides in your case.
/dev/sdaX swap swap defaults 0 0
Third we must enable SWAP
Enable the new swap partition with this command:
sudo swapon --all --verbose
Reboot
Upon rebooting you should verify swap is working:
$ cat /proc/swaps
Filename        Type        Size        Used    Priority
/dev/sda3       partition   13672444    79872   -2
Enabling hibernation
Now comes the "tricky" part.
Step 1 - Lets grab our SWAP partition UUID.
sudo blkid | grep swap
Copy the long string inbetween the quotations after UUID, example:
$ sudo blkid | grep swap
/dev/sda3: UUID="f77ed4a3-5476-4613-a62f-1c5dffa5f574" TYPE="swap" PARTUUID="6f072171-312a-4a2c-97cb-7d01a6d9679f"
The UUID in this case would be: f77ed4a3-5476-4613-a62f-1c5dffa5f574
Step 2 - Lets tell our kernel where to look for resuming
Now edit as root: /etc/default/grub (if you are using grub) or boot/loader/entries/*.conf if you are using systemd-boot.
#GRUB
sudo nano /etc/default/grub

#systemd-boot (where <latest>.conf is the most recently created)
sudo nano /boot/loader/entries/ <latest >.conf
If you are using GRUB append the line starting with GRUB _ CMDLINE _ LINUX to have the following:
# From
GRUB_CMDLINE_LINUX="quiet splash"
# To
GRUB_CMDLINE_LINUX="quiet splash resume=UUID=<YOUR_UUID>"
(<YOUR _ UUID> should be replaced by the UUID we found before.)
If you are using systemd-boot then edit your respected conf file and where it says "options" , append the line to include resume=UUID=<YOUR _ UUID>
# Created on: 2021-04-04_20-55-44
title arch-x220
linux /vmlinuz-linux
initrd /initramfs-linux.img
options root=PARTUUID=f8b6c55c-5f39-4cff-91db-3ba5eba45d3b rw intel_pstate=no_hwp text mitigations=off sysrq_always_enabled=1 transparent_hugepage=madvise selinux=0 apparmor=0 ipv6.disable=1 resume=UUID=f77ed4a3-5476-4613-a62f-1c5dffa5f574
edit:
/u/ahoyboyhoy suggests using the following command when running PopOS to append the resume flag to the kernel:
kernelstub -a 'resume=UUID=<YOUR_UUID_HERE>'
Step 3 - Enabling Hibernation on lid close
Lets tell our environment to automatically suspend-then-hibernate - Suspend then if not used for a period of time; Hibernate.
sudo ln -s /usr/lib/systemd/system/systemd-suspend-then-hibernate.service /etc/systemd/system/systemd-suspend.service
This one line is beautiful, it symlinks the systemd-suspend-then-hibernate.service to the already existing systemd-suspend.service which removes another 15-20 minutes of configuration if you were to configure this another way, it does however rely on systemd.
Conclusion
Now you should be able to shut your laptops lid and if suspend worked before it should work now, if you open the device within 2 hours (I think this is the default) it will automatically resume from suspend, but if you do not open the device within the 2 hour window then it will automatically hibernate saving all your work and should now be shut down & not consuming any battery.
On my thinkpad-x220 which is horribly power inefficient by todays standards (sandybridge i5); suspend draws about 4% per hour, whereas on my newer 10th gen intel cpu equipped laptop it only draws around 2% per hour.
Suspend is excellent but its also nice to be able to return to your machine after a week of neglect to see its battery has not died.
Sources
Useful resources:
https://wiki.archlinux.org/index.php/Talk:Power_management/Suspend_and_hibernate
https://wiki.archlinux.org/index.php/swap
https://help.ubuntu.com/community/SwapFaq
https://www.fosslinux.com/1064/how-to-create-or-add-a-swap-partition-in-ubuntu-and-linux-mint.htm - Images of Gparted.
https://forums.linuxmint.com/viewtopic.php?t=284100#5 - ubuntu 20.04 fix